Blog Architecture Part 2
My blog Part 2
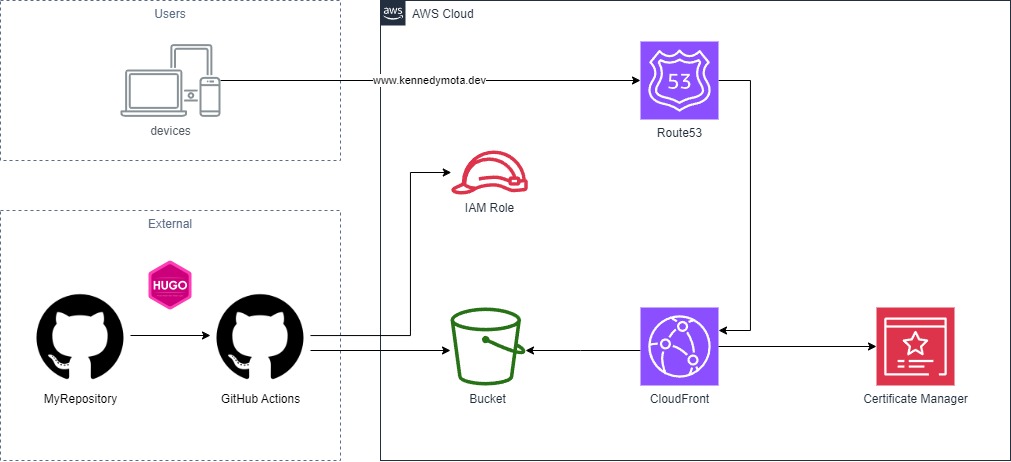
Let’s continue with the creation of the blog’s architecture and its next steps. I will leave the drawing below as support.
Architecture
Domain .dev X Amazon Route 53
The first thing you need to know is that it is not possible to work with a .dev domain on Route53 as it is not part of the AWS domain list.
After some research you find that there is no problem purchasing your domain elsewhere (eg: Google) and pointing your domain’s NS record to Route 53. And that’s what I did for my blog.
For more details on how to configure your domain: Making Route 53 the DNS service for a domain that’s in use or Godaddy DNS Management.
AWS Services
In the previous post we already talked about how to create an IAM Role to be used on GitHub, so now let’s move on to the other integrations.
Bucket S3
Let’s start with the S3 Bucket, building it is very simple, just start by provisioning a standard bucket, then we will configure the other parameters.
Remembering that we will access the resources in this bucket through a CloudFront distribution, so after provisioning we have to keep this in mind.
Certificate Manager
So that our architecture has another point of trust and security, we will add a certificate managed by AWS for our domain utilizando o serviço AWS Certificate Manager.
So that our architecture has another point of trust and security, we will add a certificate managed by AWS for our domain.
We can start with this step as well as creating the bucket.
When you request the certificate, the step that takes the most time is validation. If possible, choose validation by email as it is the simplest.
Below we have an example of how to fill in the data for your certificate
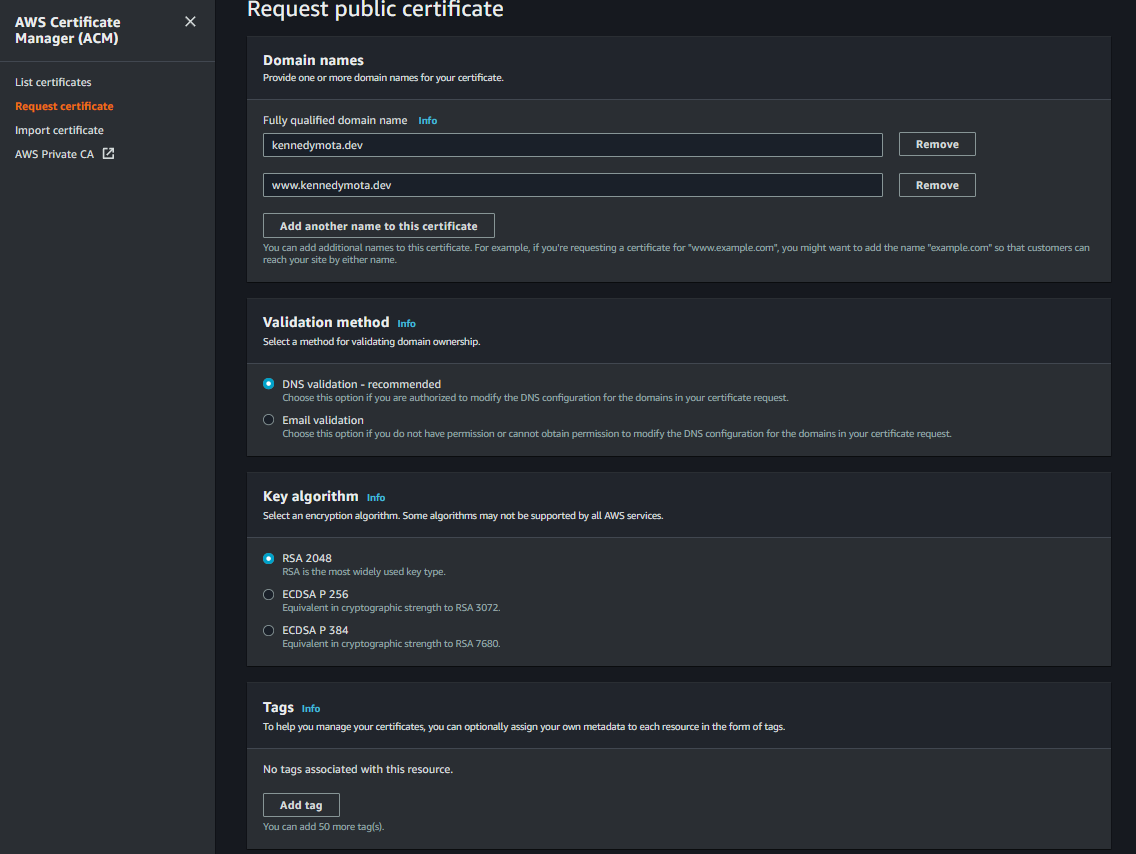
Remember to fill in the “www” and without.
If you choose to validate with DNS, I found this answer that may help with the next steps.
After the certificate is validated, let’s move on to the next step!
CloudFront
In this step we will configure our distribution to access our content in the S3 bucket.
At this point, I encountered some problems regarding permission, where when trying to access the bucket the distribution received an access denied error, but after several attempts and searches I found nothing and it simply started working.
Basically, during the distribution configuration you will choose your bucket as the source of the content and it will then fill in some fields.
The most important field here is the access configuration, where we will use the OAC (Origin Access Control) method, if there is none created, just create it and return to this step.
A little lower in the “Default cache behavior” settings you can change the “Viewer protocol policy” option to “Redirect HTTP to HTTPS”.
Arriving at the “Settings” stage, we will select our certificate that was created previously.
And remember to fill in the “Alternate domain name (CNAME)” configuration with the values “www.yourdomain.dev” and “yourdomain.dev”
After that, just finish the creation and wait for provisioning.
Soon after creating your distribution, the console will offer an S3 bucket policy that will restrict access to this created distribution, you can copy or create your own.
Return to your bucket and apply the policy, this way we will ensure that access to the objects in the bucket is only done by the distribution.
Wait for the distribution to have the Enabled status and perform a test by accessing its URL. You might find something like “«some_value».cloudfront.net” in the “Domain Name” column.
If the access is OK we can continue, if you find any access error, check this link
Now let’s perform another test, trying to access an object directly through the bucket and check if we will receive an access error.
Return to your created bucket and you can add a file to perform the test, an HTML file for example. After creating the object, look for its url (click on the object name inside the bucket or mount the url “https://<bucket_name».s3.amazonaws.com/«object_name»”).
At this stage we should receive the access denied error, due to the policy created in the bucket that restricts access to the CloudFront distribution only.
To avoid making this part too long, we will continue in the next post…